Monday, October 31, 2016

Configure Oracle Virtual Box with vdi

6:31 PM Posted by Dilli Raj Maharjan , No comments
Open Oracle VirtualBox Manager


Click on New

Type OCP_CLASS as Name, Select Linux as type, Red Hat (64-bit) as version and Click on continue.

Select Memory Size lets say in my case I want to allocated 2GB (2048 MB) as Memory and Click on continue.

Select Do not add a virtual hard drive and click on create.


Error message will be displayed. Click on continue.


New Virtual Machine OCP_CLASS has been created. Select the virtual machine and Click on Setting.


Once setting window is opened click on Storage for configuring storage setting.


Select Controller: SATA and Click on Plus sign at right to add Drive provided by instructor.

Click on existing disk, select the vdi disk file provided and Click on open.


Once you add the vdi file setting looks as on the listed above.


Click on Network to modify network setting. 

Click on Enable network and Select host only adapter as Attached to: and vboxnet0 as the Name. We are using host only network setting that will be enabled for the host machine only.

It will configure IP pool range of 192.168.56.0/24. 192.168.1.1 will be IP setting for the host and virtual machine wil be configured with the IP from pool 192.168.56.0/24
Click on OK to complete virtual box settings.

Click on Start to start virtual machine.

Login as user root and password. 

Change directory to /etc/sysconfig/network-scripts and open ifcfg-enp0s3 file


Change BOOTPROTO to static from dhcp and add following
IPADDR=192.168.56.200
NETMASK=255.255.255.0
GATEWAY=192.168.56.1
Save file and restart machine to get the change on effect.

Verify newly set ip address is set


Modify host file.


Start listener and database


Configure SQL Developer 
You can connect now.


Once your task completed you can close it and save machine state so that you can open vm immediately whenever required.

Saturday, October 29, 2016

Restore ova file Oracle VirtualBox

10:05 AM Posted by Dilli Raj Maharjan , 1 comment
Open Oracle VirtualBox.


Click on File > Import Appliance...


Select ova file location and click on Import


Importing on progress..


Once Import Complete Oracle VM will be visible. In our case VM OCP_CLASS has been created.


Select VM and Click on Start to start VM.


Login as user oracle and Start Oracle listener and Oracle database


Now you can connect to oracle with SQL Developer.


Once you have completed the practice you can save the state of machine which helps starting VM faster and you do not have to start listener and database later on.
Click on X(close). Select Save machine state and Click on OK.


To start the saved machine. Select the machine that has state saved. Click on Start to start VM.

Wednesday, October 19, 2016

Install Oracle 11g Release 2 on Linux 7

10:00 PM Posted by Dilli Raj Maharjan , 2 comments

Limitation:

Till the date this post is published, GNOME has some graphical issue while installation. So do not use GNOME as the Desktop environment, use KDE as Desktop environment instead. Popup message will be displayed title only. Following is the screenshot of the graphical issue encountered on GNOME.


Configure hosts file add IPADDRESS FQDN and hostname

vi /etc/hosts


Modify kernel parameter. Add following parameters on sysctl.conf file.

cat >> /etc/sysctl.conf
fs.aio-max-nr = 1048576
fs.file-max = 6815744
kernel.shmall = 2097152
kernel.shmmax = 3986722816
kernel.shmmni = 4096
# semaphores: semmsl, semmns, semopm, semmni
kernel.sem = 250 32000 100 128
net.ipv4.ip_local_port_range = 9000 65500
net.core.rmem_default=262144
net.core.rmem_max=4194304
net.core.wmem_default=262144
net.core.wmem_max=1048586

sysctl -p


Set process,file limitation for the users. Modify /etc/security/limits.conf

cat >> /etc/security/limits.conf
oracle              soft    nproc   2047
oracle              hard    nproc   16384
oracle              soft    nofile  4096
oracle              hard    nofile  65536
oracle              soft    stack   10240


Modify authentication module and add pam_limits on login file

vi /etc/pam.d/login
session    required     pam_limits.so


Following package are required for the installation.

binutils
compat-libstdc++-33
gcc
gcc-c++
glibc
libc-devel
ksh
libgcc
libstdc++
libstdc++-devel
libaio
libaio.i686
libaio-devel
libaio-devel.i686
libXext
libXext.i686
libXtst
libXtst.i686
libX11
libX11.i686
libXau
libXau.i686
libxcb
libxcb.i686
libXi
libXi.i686
make
sysstat
unixODBC
unixODBC-devel
zlib-devel
elfutils-libelf-devel

Execute following command to verify the package installation

rpm -q binutils compat-libstdc++-33 gcc gcc-c++ glibc glibc-devel ksh libgcc libstdc++ libstdc++-devel libaio libaio-devel libXext libXtst libX11 libXau libxcb libXi make sysstat unixODBC unixODBC-devel zlib-devel elfutils-libelf-devel


Following i686 package are required for successful installation.

compat-libstdc++-33.i686
glibc.i686
glibc-devel.i686
libgcc.i686
libstdc++.i686
libstdc++-devel.i686
libaio.i686
libaio-devel.i686
libXext.i686
libXtst.i686
libX11.i686
libXau.i686
libxcb.i686
libXi.i686

rpm -q compat-libstdc++-33.i686 glibc.i686 glibc-devel.i686 libgcc.i686 libstdc++.i686 libstdc++-devel.i686 libaio.i686 libaio-devel.i686 libXext.i686 libXtst.i686 libX11.i686 libXau.i686 libxcb.i686 libXi.i686 


Create user

groupadd -g 1001 oinstall
groupadd -g 1002 dba
groupadd -g 1003 oper

useradd -u 1001 -g oinstall -G dba,oper oracle
passwd oracle


Set selinux to permissive mode.

vi /etc/selinux/config
SELINUX=permissive
setenforce Permissive


Disable firewall


Use KDE as the desktop enviorment. There is the opoup message issue on the GNOME desktop
Create required directories

mkdir -p /u01/app/oracle/product/11.2.0.4/db_1
chown -R oracle:oinstall /u01
chmod -R 775 /u01


Set Oracle environment variables

# Environment variables for Oracle
TMP=/tmp; export TMP
TMPDIR=$TMP; export TMPDIR

ORACLE_HOSTNAME=ol7.localdomain; export ORACLE_HOSTNAME
ORACLE_UNQNAME=OEMREP; export ORACLE_UNQNAME
ORACLE_BASE=/u01/app/oracle; export ORACLE_BASE
ORACLE_HOME=$ORACLE_BASE/product/11.2.0.4/db_1; export ORACLE_HOME
ORACLE_SID=OEMREP; export ORACLE_SID
ORACLE_TERM=xterm; export ORACLE_TERM
PATH=/usr/sbin:$PATH; export PATH
PATH=$ORACLE_HOME/bin:$PATH; export PATH

LD_LIBRARY_PATH=$ORACLE_HOME/lib:/lib:/usr/lib; export LD_LIBRARY_PATH
CLASSPATH=$ORACLE_HOME/JRE:$ORACLE_HOME/jlib:$ORACLE_HOME/rdbms/jlib; export CLASSPATH


Extract database source and change directory to extracted source.
Execute runInstaller binary to begin installation.


Landing page once you execute runInstaller executable.


Uncheck "I wish to receive security updates via My Oracle Support" and Click on Next to continue.


Warning message will be poped up. Click on Yes to continue.


Select "Skip software updates" and Click on Next to continue.


Select Create and configure a database. Click on Next to continue.


Select Server Class and Click on Next to continue.


Select Single Instance database installation. Click on Next to continue.


Select Advance Install and Click on Next to continue.


Select language and Click on Next to continue.


Select database Edition and Click on Next to continue.


Select Oracle Base and Software Location and Click on Next to continue.


Select Oracle Inventory location and Oracle inventory group and Click on Next to continue.


Select the type of database to install and Click on Next to continue.


Type database name and Click on Next to continue.


Select Memory requirement. Enable Automatic Memory Management and Click on Next to continue.


Select database character set. For OEM Repository database we need to select AL32UTF8 character set and Click on Next to continue.


Select Use Oracle Enterprise Manager Database Control for database management and Click on Next to continue.


Select File System and database file location and Click on Next to continue.


Select Do not enable automated backups and Click on Next to continue.


Type password for database administration. Warning message will be displayed if new password do not follow the complexity rules. Click on Next to continue.


Type Yes on the warning window.


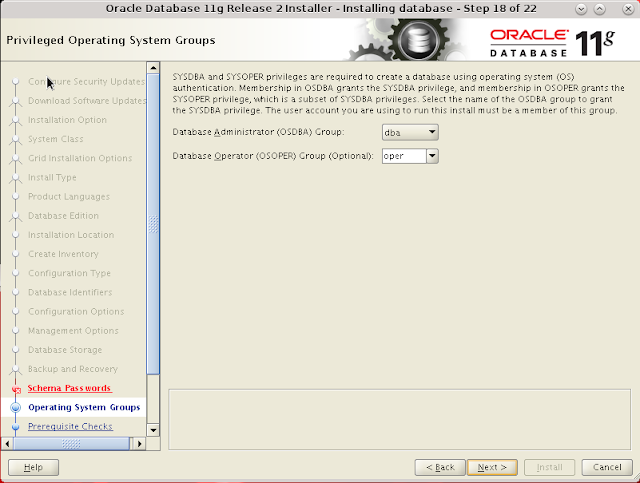
Select required OSDBA and OSOPER groups and Click on Next to continue.


Make sure that all the prerequisites are passed except pdksh package. Instead of pdksh, ksh package should be installed over there and Click on Next to continue.


Select Ignore All and Click on Next to continue.


Click Yes on the warning window.


Click on Save Response File to save the response file of the installation.


Type the response file name and Click on Save to continue.


Click on Install to begin installation.


Installation on progress.


Error message will be displayed. This can be fixed easily.
1. Change directory to newly installed ORACLE_HOME/sysman/lib
2. Open file ins_emagent.mk file
3. Search  for $(MK_EMAGENT_NMECTL)
4. Replace with $(MK_EMAGENT_NMECTL) -lnnz11


Click on Retry to resume installation.


This warning message is displayed due to ORACLE_UNQNAME. It is safe to ignore Click on OK. In our case this database itself is the repository database for OEM Cloud control so it is safe to ignore. Simply Click OK.


If we need to manage password of the user schema Click on Password Management otherwise click on OK to continue.


Execute above scripts as user root. Click on OK once execution completes.


Finally Click on Close to finish installation.