Chain Core is enterprise-grade blockchain infrastructure that enables organizations to build better financial services from the ground up. The Chain Protocol defines how assets are issued, transferred, and controlled on a blockchain network. It allows a single entity or a group of organizations to operate a network, supports the coexistence of multiple types of assets, and is interoperable with other independent networks. Issue and transfer financial assets on permissioned blockchain infrastructure.
Using Chain Core, institutions can launch and operate a blockchain network, or connect to a growing list of other networks that are transforming how assets move around the world. The Chain Protocol defines how assets are issued, transferred, and controlled on a blockchain network. It allows a single entity or a group of organizations to operate a network, supports the coexistence of multiple types of assets, and is interoperable with other independent networks.
Advantages:
- Fast & performant
- Scalable & available
- Connectable & extensible
Designed for developers with following feature:
- Developer dashboard
- Intelligent queries
- Multi-language support

Environment:
- OS: CentOS Linux release 7.4.1708
- Memory: 2G
- HDD: 120G
- Platform: x86_64
Dependent packages:
- golang.x86_64
- postgresql.x86_64(version 9.6 or greater)
- postgresql-server.x86_64 (version 9.6 or greater)
- cmake.x86_64
- protoc-3.5.1-linux-x86_64.zip
- git.x86_64
Install golang, cmake and git with yum command
yum -y install golang cmake git

Make sure postgresql 9.6 or higher is available in default yum repository. If they are not available visit URL https://www.postgresql.org/download/linux/redhat/
Once you open the URL select appropriate options and execute the yum command listed on the page.


Install new repo for postgresql-9.6
yum install https://download.postgresql.org/pub/repos/yum/9.6/redhat/rhel-7-x86_64/pgdg-centos96-9.6-3.noarch.rpm

Install the client packages:
yum install postgresql96

Install the server packages:
yum install postgresql96-server

After installation is finished. Initialize postgresql database and enable postgresql at startup with command below
/usr/pgsql-9.6/bin/postgresql96-setup initdb
systemctl enable postgresql-9.6
systemctl start postgresql-9.6

Download protoc package from the URL below
cd /usr/local/src/
wget https://github.com/google/protobuf/releases/download/v3.2.0/protoc-3.2.0-linux-x86_64.zip

Unzip the downloaded compressed file with command below
unzip protoc-3.2.0-linux-x86_64.zip

Copy binary from bin directory to /usr/local/bin and content of include to /usr/local/include/
cp bin/* /usr/local/bin/
cp -r include/* /usr/local/include/

Make directory for chain source and export it as CHAIN environment variable.
cd /opt
mkdir chain
export CHAIN=/opt/chain/

git clone chain repo.
git clone git://github.com/chain/chain $CHAIN

Create chain owner OS user
useradd chain
passwd chain

Configure Postgresql database
Create chain postgresql database user
create user chain with createdb password 'AL********V$';
Create chain and core database
create database chain;
create database core;

Change owner of core, chain database as chain.
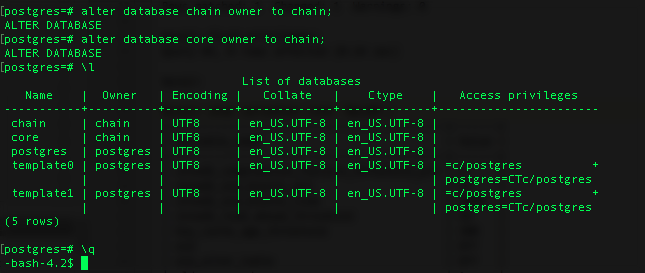
alter database chain owner to chain;
alter database core owner to chain;
Verify the change with \l command
Modify pg_hba.conf file with vi editor
vi /var/lib/pgsql/9.6/data/pg_hba.conf
Permit user chain to access chain, core database without password.
OLD VALUES:
host all all 127.0.0.1/32 ident
host all all ::1/128 ident
NEW VALUES:
host chain,core chain 127.0.0.1/32 trust
host chain,core chain ::1/128 trust
Before:

After:

Once you modify restart postgresql server
systemctl restart postgresql-9.6

Enter chain source directory and build cored and corectl with command below
cd /opt/chain/
./bin/build-cored-release chain-core-server-1.2.0 .

Change ownership of chain source directory to chain owner.
chown -R chain:chain /opt/chain

Switch user as chain ans start cored process
su - chain
cd /opt/chain
./cored

Create token with command below. Example below creates token for dillidba tokenname. You can use any name for tokenname.
su - chain
cd /opt/chain/
./corectl create-token dillidba

Configure and allow default port 1999 to access chain core.
firewall-cmd --get-active-zone
firewall-cmd --zone=public --add-port=1999/tcp --permanent
firewall-cmd --reload

Open http://IPaddress:1999 port to access chain core.
http://192.168.100.104:1999

Landing page will be for the token login.

Type token login created above and click on Log In.

Now you will have 3 option.
- Create New blockchain network
- Join existing blockchain network
- Join the Chain testnet

If we Clicked on Create new blockchain network then following 5-minute tutorial will be displayed. We have option to skip or go with the tutorial.

If we skip the tutorial and following is the page to create new Account, Assests and Transactions.
